概述
将流程分为三大部分
| 部分 | 说明 | 对应步骤 |
|---|---|---|
| 第一部分 | 加载时机的触发逻辑 | 1-7 |
| 第二部分 | bundle加载过程 | 8-15 |
| 第三部分 | bundle代码初始化 | 16-19 |
- class
- resource
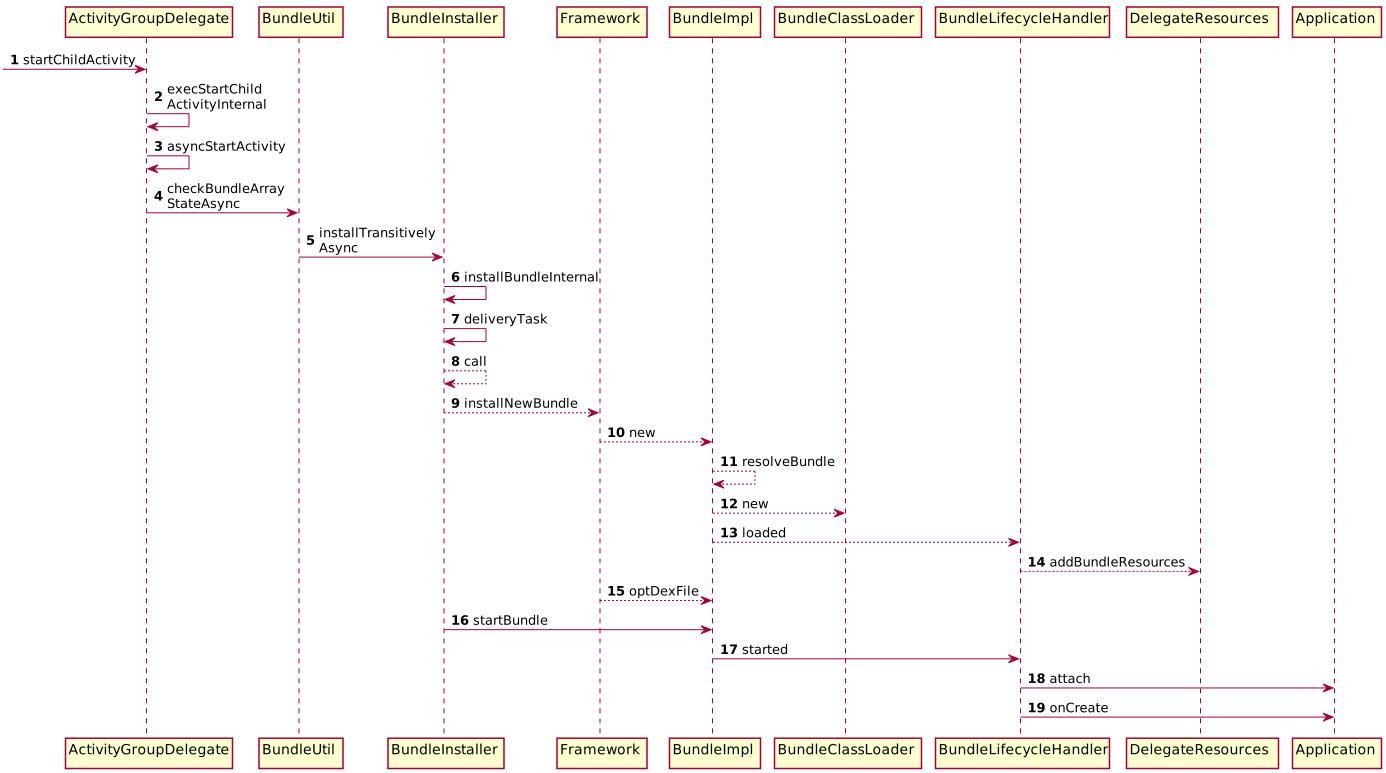
注意图中的箭头
- 实线箭头表示运行在主线程
- 虚线箭头表示运行在HandlerThread中
将流程分为三大部分
| 部分 | 说明 | 对应步骤 |
|---|---|---|
| 第一部分 | 加载时机的触发逻辑 | 1-7 |
| 第二部分 | bundle加载过程 | 8-15 |
| 第三部分 | bundle代码初始化 | 16-19 |
第一部分 触发时机
入口
以在MainActivity中点击secondebundle为例
MainActivity.java
case R.id.navigation_dashboard:
	switchToActivity("second","com.taobao.secondbundle.SecondBundleActivity")
switchActivity 辗调用,会执行到第2步execStartChildActivityInternal方法中
execStartChildActivityInternal
ActivityGroupDelegate.java
public void execStartChildActivityInternal(ViewGroup container,String key, Intent intent){
	String bundleName = AtlasBundleInfoManager.instance().getBundleForComponet(componentName);
	if(!TextUtils.isEmpty(bundleName)){
		BundleImpl impl = (BundleImpl) Atlas.getInstance().getBundle(bundleName);
		if(impl!=null&&impl.checkValidate()) {	}else {
		//...
		asyncStartActivity(container,key,bundleName,intent);
	}
}- 首先,根据componentName即
com.taobao.secondbundle.SecondBundleActivity,查询bundle的名称。在atlas启动过程(下)中,我们知道AtlasBundleInfoManager中存储了几乎所有bundle的信息,所以返回 bundleName 就是com.taobao.secondbundle。 - 然后,根据bundlename,去查询bundle加载后的结构体-
BundleImpl。由于secondbundle之前并没有加载进来,所以会执行到第3步asyncStartActivity方法。
asyncStartActivity最终调用了BundleUtil的方法,我们直接看第4步 checkBundleStateAsync
checkBundleStateAsync
BundleUtil.java
public static boolean checkBundleArrayStateAsync(final String[] bundlesName, final Runnable bundleActivated, final Runnable bundleDisabled){
	BundleInstaller installer = BundleInstallerFetcher.obtainInstaller();
	installer.installTransitivelyAsync(bundlesName, new BundleInstaller.InstallListener() {
		@Override
		public void onFinished() {
			boolean success = true;
			BundleImpl tmp;
			for(String bundleName : bundlesName){
				if((tmp=((BundleImpl) Atlas.getInstance().getBundle(bundleName)))==null || !tmp.checkValidate()){
					success = false;
				}else{
					tmp.startBundle();
				}
          }
       });
	return true;
}在这一步中,开始异步加载bundle,成功后,在主线程中回调onFinished(后面会提及),调用BundleImpl对象的startBundl方法,开始 第三部分 的初始化过程。
deliveryTask
第5、6步,主要是各种逻辑判断,之后辗转调用到7步。直接看第7步deliveryTask的函数实现。
BundleUtil.java
private void deliveryTask(boolean sync){
	Runnable installTask = new Runnable() {
		@Override
		public void run() {
			synchronized (BundleInstaller.this) {
             	try{
             		call();
             	} catch (Throwable e) {
             		e.printStackTrace();
             	} finally {
             		if (mListener != null) {
             			new Handler(Looper.getMainLooper()).post(new Runnable() {
             				@Override
             				public void run() {
             					mListener.onFinished();
             				}
         		//..
        };
        sBundleHandler.post(installTask);

    }
}
函数首先创建了一个异步任务 installTask,之后将任务提交给sBundleHandler。而sBundleHandler实际上关联的是一个HandlerThread,所以,installTask 是运行在单独的线程中的。
在 installTask 中
- 调用了
call函数 - 向ui线程提交一个任务,用于回调
onFinished
到目前为止,第一部分分析完毕,我们进入第二部分 加载过程
第二部分 加载过程
需要注意的是,第二部分整体是运行在 HandlerThread 中的。
回顾一下第二部分的运行时序

call
call(){
	//...
	if (FileUtils.getUsableSpace(Environment.getDataDirectory()) >= 5) {
		//has enough space
		if(AtlasBundleInfoManager.instance().isInternalBundle(bundleName)) {
			bundle = installBundleFromApk(bundleName);
			if (bundle != null) {
				((BundleImpl) bundle).optDexFile();
			}
		}
	} else {
		throw new LowDiskException("no enough space");
	}
	//...
}
这里有两个判断条件
- 剩余存储空间满足
- 是内置bundle
当两个条件都满足时,执行bundle的安装和optDexFile操作。
installBundleFromApk 又调用了 installNewBundle方法,直接看第9步 - installNewBundle 的实现。
installNewBundle
Framework.java
static BundleImpl installNewBundle(final String location, final InputStream in)throws BundleException {
	//...
	BundleListing.BundleInfo info = AtlasBundleInfoManager.instance().getBundleInfo(location);
	BundleImpl bundle = new BundleImpl(bundleDir, location, new BundleContext(), null, file,version,true,-1);
	return bundle;
}
函数很简单,获取bundle的信息,之后构造一个BundleImpl对象。
有两个参数需要注意一下
| 参数 | 说明 |
|---|---|
| bundleDir | /data/data/com.taobao.demo/files/storage/com.taobao.secondbundle |
| in | 指向 lib/armeabi/libcom_taobao_secondbundle.so |
BundleImpl
来看BundleImpl的构造函数
BundleImpl.java
BundleImpl(final File bundleDir, final String location, final BundleContext context, final InputStream stream,...) throws BundleException, IOException{
		if (stream != null) {
            this.archive = new BundleArchive(location,bundleDir, stream,version, dexPatchVersion);
        }

        if (autoload) {
            resolveBundle();
            Framework.bundles.put(location, this);
        }
}
首先创建了一个BundleArchive对象,bundleArchive持有bundleDir和InputStream的引用,用来做dexOpt的( ? todo ),暂时不关注,往下走
resolveBundle
BundleImpl.java
    private synchronized void resolveBundle() throws BundleException {
    	//...
    	if ( this.classloader == null){
	        // create the bundle classloader
            List<String> dependencies = AtlasBundleInfoManager.instance().getDependencyForBundle(location);
            String nativeLibDir = getArchive().getCurrentRevision().getRevisionDir().getAbsolutePath()+"/lib"+":"
                    + RuntimeVariables.androidApplication.getApplicationInfo().nativeLibraryDir+":"
                    +System.getProperty("java.library.path");
            if(dependencies!=null) {
                for (String str : dependencies) {
                    BundleImpl impl = (BundleImpl) Atlas.getInstance().getBundle(str);
                    if (impl != null) {
                        nativeLibDir += ":";
                        File dependencyLibDir = new File(impl.getArchive().getCurrentRevision().getRevisionDir(), "lib");
                        nativeLibDir += dependencyLibDir;
                    }
                }
            }
	        this.classloader = new BundleClassLoader(this,dependencies,nativeLibDir);
    	}

        // notify the listeners
        Framework.notifyBundleListeners(0 /*LOADED*/, this);
    }
为bundle创建一个classloader,在创建classloader的过程中
- 指定bundle自身依赖so的路径
- 指定依赖bundle所依赖so的路径
比如在demo中 ,nativeLibDir的 值为 /data/user/0/com.taobao.demo/files/storage/com.taobao.secondbundle/version.1/lib:/data/app/com.taobao.demo-1/lib/x86:/vendor/lib:/system/lib
创建完BundlerClassLoader后,在最后一行进行回调,这里的回调实现类是 BundleLifecycleHandler
BundleLifecycleHandler.java
 public void bundleChanged(final BundleEvent event){
        switch (event.getType()) {
            case 0:/* LOADED */
                loaded(event.getBundle());
}
loaded
private void loaded(Bundle bundle) { long time = System.currentTimeMillis();
        BundleImpl b = (BundleImpl) bundle;
        DelegateResources.addBundleResources(
        	b.getArchive().getArchiveFile().getAbsolutePath()
        );
}
todo 资源处理实现说明
回到第10步
BundleImpl.java
BundleImpl(final File bundleDir, final String location...) {
	//...
	resolveBundle();
	Framework.bundles.put(location, this);
}
在resolveBundle函数执行周期内,主要完成了两件事
- 为bundle创建了独立的ClassLoader
- 将bundle中的资源添加到Resource上
第二行函数将bundle的信息加入到已加载的列表中。
完成之后,回到第8步,执行optDexFile方法。
optDexFile
。。。
第三部分 初始化过程
整个第三部分运行在 UI 线程中
bundle加载完成后,第7步,在UI线程中回调了完成的接口,调用了startbundle方法又经过辗转调用,到了BundleLifecycleHandler的startd方法中。
BundleLifecycleHandler.java
private void started(Bundle bundle){
	BundleImpl b = (BundleImpl) bundle;
	BundleListing.BundleInfo info = AtlasBundleInfoManager.instance().getBundleInfo(b.getLocation());
	//...
	String appClassName = info.getApplicationName();
	Application app = newApplication(appClassName, b.getClassLoader());
	app.onCreate();
}在第6行构造出bundle中注册的application对象,之后执行application的onCreate方法。对于appliation来说,似乎还差一个关键的attachBaseContext的入口函数调用,我们接着看构造过程。
BundleLifecycleHandler.java
protected static Application newApplication(String applicationClassName, ClassLoader cl) throws ApplicationInitException {
	final Class<?> applicationClass = cl.loadClass(applicationClassName);
	Application app = (Application) applicationClass.newInstance();
	AtlasHacks.Application_attach.invoke(app, RuntimeVariables.androidApplication);
	return app;
}
首先,根据类名加载对应的class,之后反射执行applciation的attach方法。
在atlas启动过程(下)下中,解释过,application的attach方法最终会调用到attachBaseContext方法。
最后,大概看一下DelegateClassLoader加载bundle中class的过程。
DelegateClassLoader.java
protected Class<?> findClass(String className) throws ClassNotFoundException {
	Class<?> clazz = loadFromInstalledBundles(className,false);
	//...
	return clazz;
}

static Class<?> loadFromInstalledBundles(String className,boolean safe)
            throws ClassNotFoundException {
	String bundleName = AtlasBundleInfoManager.instance().getBundleForComponet(className);
	BundleImpl bundle = (BundleImpl) Atlas.getInstance().getBundle(bundleName);
	//...
	ClassLoader classloader = bundle.getClassLoader();
	Class<?>  clazz = classloader.loadClass(className);
	return clazz;
}可以看到,classloader先从bundle上去找的。而loadFromInstalledBundles逻辑如下:
- 从
AtlasBundleInfoManager上已加载的列表中找到对应bunde(在第在第10步中添加) - 从对应bundle上的classloader上加载对应的class。
到这里为止,整个bundle的加载、初始化过程分析完毕。