概述
对应官网文档地址
Atlas整个启动过程的时序如下图所示,本篇只关注下图中的1-5步。

入口
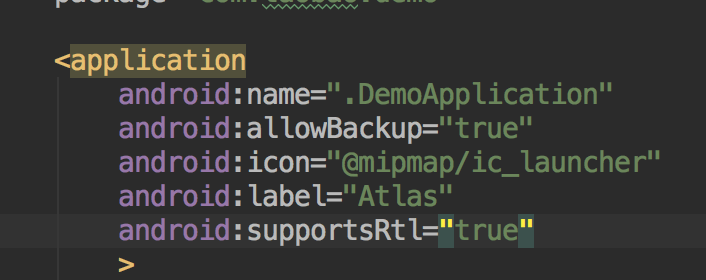
我们都知道,app的入口是application,那么atlas的入口application是什么呢,看一下app模块中manifest中的定义

看样子,是DemoApplication
真的是这样的吗?
当然不是
我们看一下反编译后的manifest

为什么会是AtlasBridgeApplication呢,manifest中明明写的很清楚 : DemoApplication。
事实上为了接入的方便,Atlas在编译期就替换了入口application。不过,Atlas保证在运行期时会调用DemoApplication的相关方法。
1. AtlasBridgeApplication.attachBaseContext
我们看一下AtlasBridgeApplication中的相关方法
1
2
3
4
5
6
7
8
9
10
11
12
13
14
| @Override
protected void attachBaseContext(Context base) {
super.attachBaseContext(base);
Class BridgeApplicationDelegateClazz = getBaseContext().getClassLoader().loadClass("android.taobao.atlas.bridge.BridgeApplicationDelegate");
Constructor<?> con = BridgeApplicationDelegateClazz.getConstructor(parTypes);
mBridgeApplicationDelegate = con.newInstance(this,getProcessName(...);
Method method = BridgeApplicationDelegateClazz.getDeclaredMethod("attachBaseContext");
method.invoke(mBridgeApplicationDelegate);
}
|
可以看到,代码虽长,但其实就只干了两件事。
- 反射并构造BridgeApplicationDelegate的实例
- 执行BridgeApplicationDelegate的attachBaseContext方法。
先看BridgeApplicationDelegate的构造方法。
1
2
3
4
5
6
7
|
public BridgeApplicationDelegate(Application rawApplication...){
mRawApplication = rawApplication;
PackageManagerDelegate.delegatepackageManager(
rawApplication.getBaseContext()
);
}
|
没什么内容,直接跟进delegatepackageManager的函数实现
1
2
3
4
5
6
7
8
9
10
11
12
13
14
15
16
|
public static void delegatepackageManager(Context context){
mBaseContext = context;
PackageManager manager = mBaseContext.getPackageManager();
Class ApplicationPackageManager = Class.forName("android.app.ApplicationPackageManager");
Field field = ApplicationPackageManager.getDeclaredField("mPM");
field.setAccessible(true);
Object rawPm = field.get(manager);
Class IPackageManagerClass = Class.forName("android.content.pm.IPackageManager");
mPackageManagerProxyhandler = new PackageManagerProxyhandler(rawPm);
mProxyPm = Proxy.newProxyInstance(mBaseContext.getClassLoader(), new Class[]{IPackageManagerClass}, mPackageManagerProxyhandler);
field.set(manager, mProxyPm);
}
|
可以看到,这段代码的核心思想就是将系统的pm,替换为我们实现的PackageManagerProxyhandler。我们先不关注PackageManagerProxyhandler的实现,接着看BridgeApplicationDelegate中函数attachBaseContext的实现。
2. BridgeApplicationDelegate. attachBaseContext
BridgeApplicationDelegate.java
1
2
3
4
5
6
7
8
9
10
11
12
13
| public void attachBaseContext(){
AtlasHacks.defineAndVerify();
launcher.initBeforeAtlas(mRawApplication.getBaseContext());
Atlas.getInstance().init(mRawApplication, mIsUpdated);
AtlasHacks.ActivityThread$AppBindData_providers.set(mBoundApplication,null);
}
|
函数实现大概分为四个部分,也是本篇文章的重点关注部分
- hook之前的准备工作
- 回调预留接口
- 初始化atlas
- 处理provider
我们也一个来看。
#3. AtlasHacks.defineAndVerify
在开始分析之前,我们要知道,Android上动态加载方案,始终都绕不过三个关键的点:
- 动态加载class
- 动态加载资源
- 处理四大组件 能够让动态代码中的四大组件在Android上正常跑起来
为了实现这三个目标,会在系统关键调用的地方进行Hook。比如,为了能够动态加载class,通常都会对classloader上动一些手脚,resource也是类似。
这里多提一句,在四大组件的处理上,atals与插件化有着很大的差异。
- 插件化的核心思想其实是埋坑机制+借尸还魂 :通过预先在manifest中预留N个组件坑,在runtime时,通过“借尸还魂”实现四大组件的运行。
- atlas不一样,它是在编译期就已经各个bundle的manifest写入到apk中。所以运行时,bundle中的组件可以和常规声明的组件一样正常运行,不用再做额外的处理。
回过头来,我们看看atlas为了实现上述目的,做了哪些准备工作。在跟进defineAndVerify函数的实现之前,先看一下AtlasHacks类中定义的字段
1
2
3
4
5
6
7
8
9
10
11
12
13
14
15
16
17
18
19
20
| //AtlasHacks.java
// Classes
public static HackedClass<Object> LoadedApk;
public static HackedClass<Object> ActivityThread;
public static HackedClass<android.content.res.Resources> Resources;
// Fields
public static HackedField<Object, Instrumentation> ActivityThread_mInstrumentation;
public static HackedField<Object, Application> LoadedApk_mApplication;
public static HackedField<Object, Resources> LoadedApk_mResources;
// Methods
public static HackedMethod ActivityThread_currentActivityThread;
public static HackedMethod AssetManager_addAssetPath;
public static HackedMethod Application_attach;
public static HackedField<Object, ClassLoader> LoadedApk_mClassLoader;
// Constructor
public static Hack.HackedConstructor PackageParser_constructor;
|
给这段代码点个赞,非常的干净和清晰。代码定义了atlas框架所需要hook的所有的类、方法、属性等等字段。
- 处理资源,hook Resources
- 处理class,hook LoadedApk_mClassLoader
- …
现在,在看defineAndVerify函数的实现
1
2
3
4
5
6
7
| //AtlasHacks.java
public static boolean defineAndVerify() throws AssertionArrayException {
allClasses();
allConstructors();
allFields();
allMethods();
}
|
实际上这四个级别的函数调用,对应之前定义的字段,为这些字段进行赋值。
1
2
3
4
5
6
7
8
9
10
11
12
13
14
15
|
public static void allClasses() throws HackAssertionException {
LoadedApk = Hack.into("android.app.LoadedApk");
ActivityThread = Hack.into("android.app.ActivityThread");
Resources = Hack.into(Resources.class);
ActivityManager = Hack.into("android.app.ActivityManager");
}
public static void allFields() throws HackAssertionException {
ActivityThread_mInstrumentation = ActivityThread.field("mInstrumentation").ofType(Instrumentation.class);
ActivityThread_mAllApplications = ActivityThread.field("mAllApplications").ofGenericType(ArrayList.class);
}
|
这几个函数的代码并不复杂,是对定义的Class、Field、Method和Contructor 这些字段进行初始化赋值工作。
执行到这里时,atlas框架的准备工作完成,接下来,就是整个框架的初始化了。
#4 回调预留接口
时序图中的第4步,即BridgeApplicationDelegate的attachBaseContext方法中,,做了一个接口回调。
BridgeApplicationDelegate.java
1
2
3
4
5
6
| public void attachBaseContext(){
String preLaunchStr = (String) RuntimeVariables.getFrameworkProperty("preLaunch");
AtlasPreLauncher launcher = (AtlasPreLauncher) Class.forName(preLaunchStr).newInstance();
launcher.initBeforeAtlas(mRawApplication.getBaseContext());
}
|
函数通过“preLaunch”字段读取一个类名,反射该类上的initBeforeAtlas方法。
AtlasPreLauncher实际上是一个接口,供接入者使用。在这个点,atlas还没有开始对系统进行hook,仍然是Android原生态的运行时环境。
那么这个preLaunch的字段在哪里定义的呢,我们反推一下。
RuntimeVariables.java
1
2
3
4
5
| public static Object getFrameworkProperty(String fieldName){
Field field = FrameworkPropertiesClazz.getDeclaredField(fieldName);
return field.get(FrameworkPropertiesClazz);
}
|
实现很简单,读取FrameworkProperties上的静态属性字段,接着跟进。
1
2
| public class FrameworkProperties {
}
|
什么情况,怎么什么都没有? 所谓反常即为💊,直接看反编译后的代码
FrameworkProperties.java
1
2
3
4
5
6
7
8
9
10
| public class FrameworkProperties{
public static String autoStartBundles;
public static String preLaunch;
static{
autoStartBundles = "com.taobao.firstbundle";
preLaunch = "com.taobao.demo.DemoPreLaunch";
}
}
|
从反编译后的代码可以看到,”prelaunch”对应的内容是com.taobao.demo.DemoPreLaunch,那么这个值是在 什么时候写入又是在哪里配置 的呢?
大家回想一下,在之前Atlas之由gradle开始到apk结束中提到过,atlas的gradle插件在编译期搞了很多事情,我们看gradle中的设置
1
2
3
4
5
6
| atlas{
tBuildConfig {
autoStartBundles = ['com.taobao.firstbundle']
preLaunch = 'com.taobao.demo.DemoPreLaunch'
}
}
|
和FrameworkProperties中的字段完美对应。
这个部分牵涉开发-编译-运行三个阶段,放一张图捋一下关系。

#5 atlas.init
准备工作做好之后,就是初始化了。
Atlas.java
1
2
3
4
5
6
7
8
9
10
11
| public void init(Application application,boolean reset) {
//读取配置项
ApplicationInfo appInfo = mRawApplication.get...;
mRealApplicationName = appInfo.metaData.getString("REAL_APPLICATION");
boolean multidexEnable = appInfo.metaData.getBoolean("multidex_enable");
if(multidexEnable){
MultiDex.install(mRawApplication);
}
//...
}
|
首先是读取manifest中的配置数据multidexEnable和mRealApplicationName,这两个数据也是在编译期由atlas插件写到manifest中的。

multidexEnable 是true,这个在gradle中可配
mRealApplicationName 实际上是DemoApplication,即app工程在manifest中指定的启动路径。
捋清楚这几个参数之后,往下看Atlas框架初始化实现
Atlas.java
1
2
3
4
5
6
7
8
9
10
11
12
13
14
15
16
17
18
19
20
21
22
23
24
25
26
| public void init(Application application,boolean reset) {
//...
Atlas.getInstance().init(mRawApplication, mIsUpdated);
}
public void init(Application application,boolean reset) throws AssertionArrayException, Exception {
//...
//1. 换classloader
AndroidHack.injectClassLoader(packageName, newClassLoader);
//2. 换Instrumentatio
AndroidHack.injectInstrumentationHook(new InstrumentationHook(AndroidHack.getInstrumentation(), application.getBaseContext()));
//3. hook ams
try {
ActivityManagerDelegate activityManagerProxy = new ActivityManagerDelegate();
Object gDefault = null;
if(Build.VERSION.SDK_INT>25 || (Build.VERSION.SDK_INT==25&&Build.VERSION.PREVIEW_SDK_INT>0)){
gDefault=AtlasHacks.ActivityManager_IActivityManagerSingleton.get(AtlasHacks.ActivityManager.getmClass());
}else{
gDefault=AtlasHacks.ActivityManagerNative_gDefault.get(AtlasHacks.ActivityManagerNative.getmClass());
}
AtlasHacks.Singleton_mInstance.hijack(gDefault, activityManagerProxy);
}catch(Throwable e){}
//4. hook H
AndroidHack.hackH();
}
|
这段代码,就是对系统关键节点进行了hook,具体的hook实现这里就不贴出了,如果感兴趣,可以参考demo源码以及田维术的blog,如何hook,以及为什么在这里hook,在文章中都讲的非常清楚。
函数中的hook点
| hook点 |
实例 |
| ActivityThread.mLoadedApk.mClassLoader |
DelegateClassLoader |
| ActivityThread.mInstrumentation |
InstrumentationHook |
| ActivityManagerNative.gDefault.get |
ActivityManagerDelegate |
| android.app.ActivityThread$H.mCallback |
ActivityThreadHook |
6. 处理provider
在第2步的2.4部分,对provider进行了处理
BridgeApplicationDelegate.java
1
2
3
4
5
6
7
8
9
10
| public void attachBaseContext(){
Object mBoundApplication = AtlasHacks.ActivityThread_mBoundApplication.get(activityThread);
mBoundApplication_provider = AtlasHacks.ActivityThread$AppBindData_providers.get(mBoundApplication);
if(mBoundApplication_provider!=null && mBoundApplication_provider.size()>0){
AtlasHacks.ActivityThread$AppBindData_providers.set(mBoundApplication,null);
}
}
|
第4行代码读取provider数据,如果有provider信息的话,则在第6行从系统删除,让系统认为apk并没有申请任何provider。
为什么这么做?回顾一下app启动的流程

可以看到,在第4步和第7步两个关键调用之间,第5步调用了函数installContentProviders,跟进去看一下。
1
2
3
4
5
| private void installContentProviders(Context context, List<ProviderInfo> providers) {
for (ProviderInfo cpi : providers) {
installProvider(context, null, cpi,...);
}
}
|
收集了所有provider的信息,然后调用installProvider函数
1
2
3
4
5
| private IActivityManager.ContentProviderHolder installProvider(Context context,IActivityManager.ContentProviderHolder holder, ProviderInfo info,...) {
final java.lang.ClassLoader cl = c.getClassLoader();
localProvider = (ContentProvider)cl.loadClass(info.name).newInstance();
//...
}
|
可以看到,函数是根据在manifest中登记的provider信息,实例化对象。
__那么问题来了__,有些provider是存在于bundle中的,主dex中并不存在。如果不处理,在这里程序会因为ClassNotFind崩溃。所以这里要先清除掉provier的信息,延迟加载。
上篇先到这里,各位先喝口水,再来下篇的分析。


