要点
Activity启动过程
Activity与AMS联系
Activity与WMS联系
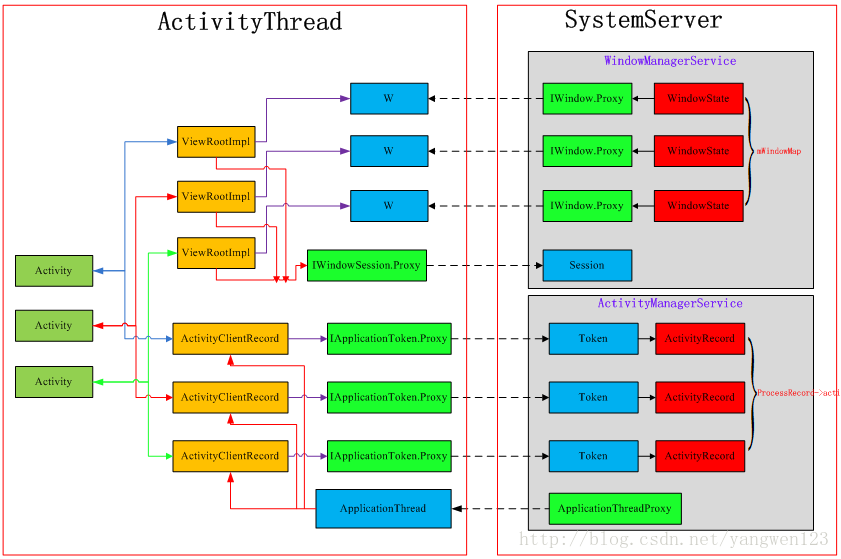
先放一张概览图,出处:图片出处
代码以API 21为准
Activity启动过程 放一张Actvity启动过程的时序图
startActivity 通常调用方法Context.startActivity,最后会调用到AMS的startActivity方法,调用链如下:
通过binder调用到AMS.startActivity方法后,最终会调到ActivityStackSupervisor的realStartActivityLocked方法,进入AMS进程
1
2
3
4
5
6
7
8
9
10
/** ActivityStackSupervisor **/ final boolean realStartActivityLocked(ActivityRecord r,ProcessRecord app, boolean andResume, boolean checkConfig)throws RemoteException { //将进程描述符记录在Activity描述符中 r.app = app; int idx = app.activities.indexOf(r); //将Activity添加到进程启动的Activity列表中 if (idx < 0) app.activities.add(r); //通知应用进程加载Activity app.thread.scheduleLaunchActivity(new Intent(r.intent), r.appToken,参数) }
app.thread是IAppliconThread的远程代理对象,实例对象存在与应用进程中。
r.appToken在AMS是IApplicationToken的Bindr实例对象
通过过binder通信,进入App进程:
1
2
3
4
5
6
7
8
/** ActivityThread **/ public final void scheduleLaunchActivity(Intent intent, IBinder token,参数){ ActivityClientRecord r = new ActivityClientRecord(); r.token = token; ... //将记录发送给ActivityThread上的Handler,异步启动 queueOrSendMessage(H.LAUNCH_ACTIVITY, r); }
将数据发送给ActivityThread上的mH对象,看实现
1
2
3
4
5
6
7
8
9
10
11
12
private class H extends Handler { public void handleMessage(Message msg) { switch (msg.what) { case LAUNCH_ACTIVITY: { ActivityClientRecord r = (ActivityClientRecord)msg.obj; //获得Activity所属包的信息 r.packageInfo = getPackageInfoNoCheck(r.activityInfo.applicationInfo, r.compatInfo); handleLaunchActivity(r, null); } break; } } }
Handler将逻辑转发到ActivityThread的handleLaunchActivity方法,继续看实现
1
2
3
4
5
6
7
private void handleLaunchActivity(ActivityClientRecord r, Intent customIntent) { //1. 初始化Activity Activity a = performLaunchActivity(r, customIntent); //2. 执行Activity的onResume函数 handleResumeActivity(r.token, false, r.isForward, !r.activity.mFinished && !r.startsNotResumed); }
先看performLaunchActivity函数实现,handleResumeActivity牵扯WMS,放在后面第三节分析。
先看performLaunchActivity函数实现
1
2
3
4
5
6
7
8
9
10
11
12
13
14
15
16
private Activity performLaunchActivity(ActivityClientRecord r, Intent customIntent) { //1. 实例化Activity对象 Activity activity = null; java.lang.ClassLoader cl = r.packageInfo.getClassLoader(); activity = mInstrumentation.newActivity(cl, component.getClassName(), r.intent); //2. 为Activity创建Application对象 Application app = r.packageInfo.makeApplication(false, mInstrumentation); //3. 为Activity创建ContextImpl对象 Context appContext = createBaseContextForActivity(r, activity); //4. 将Activity与创建的对象关联 activity.attach(appContext,..., r.token,app,...参数 ); //5. 调用Activity的onCreate方法 mInstrumentation.callActivityOnCreate(activity, r.state); //6. 记录Activity信息 mActivities.put(r.token, r); }
实例化Activity对象
为Activity创建Application对象 1 2 3 4 5 6 7 8 9 10 11 12 13 14 public Application makeApplication(boolean forceDefaultAppClass, Instrumentation instrumentation) { //mApplication为单例,整个进程有且存在一个 if (mApplication != null) { return mApplication; } //创建Application对象 Application app = null; java.lang.ClassLoader cl = getClassLoader(); ContextImpl appContext = ContextImpl.createAppContext(mActivityThread, this); app = mActivityThread.mInstrumentation.newApplication(cl, appClass, appContext); appContext.setOuterContext(app); retrun app; }
为Activity创建ContextImpl对象 1 2 3 4 5 6 private Context createBaseContextForActivity(ActivityClientRecord r, final Activity activity) { ContextImpl appContext = ContextImpl.createActivityContext( this, r.packageInfo, displayId, r.overrideConfig); appContext.setOuterContext(activity); retrun appContext; }
调用Activity的attach方法,将数据和Activity绑定
通过Instrumentaion调用Activity的onCreate方法
记录Activity信息
到此,Activity启动过程的主要路径分析完毕,
Activity初始化 Activity.attach 1 2 3 4 5 Activity->PhoneWindow: new Activity->ContextImpl: getSystemService ContextImpl->SystemServiceRegistry: getSystemService Activity->PhoneWindow: setWindowManager PhoneWindow->WindowManagerImpl: createLocalWindowManager
1 2 3 4 5 6 7 8 9 10 11 12 /** Activity **/ final void attach(Context context,ActivityThread aThread,..., IBinder token,...,Application application ...) { attachBaseContext(context); //创建窗口 mWindow = new PhoneWindow(this); mUiThread = Thread.currentThread(); mMainThread = aThread; //用于和AMS服务通信的IApplicationToken.Proxy代理对象 mToken = token; //设置窗口管理器 mWindow.setWindowManager((WindowManager)context.getSystemService(Context.WINDOW_SERVICE),mToken, ...); }
ContextImpl.getSystemService
1 2 3 4 5 6 7 /** * Gets a system service from a given context. */ public static Object getSystemService(ContextImpl ctx, String name) { ServiceFetcher<?> fetcher = SYSTEM_SERVICE_FETCHERS.get(name); return fetcher != null ? fetcher.getService(ctx) : null; }
以String为key从ServiceFetcher上找,看注册时的实现
1 2 3 4 5 6 registerService(Context.WINDOW_SERVICE, WindowManager.class,new CachedServiceFetcher<WindowManager>() { @Override public WindowManager createService(ContextImpl ctx) { return new WindowManagerImpl(ctx.getDisplay()); } });
最后返回的是一个WindowManagerImpl对象。
1 2 3 4 public void setWindowManager(WindowManager wm, IBinder appToken, String appName, boolean hardwareAccelerated) { mWindowManager = ((WindowManagerImpl)wm).createLocalWindowManager(this); }
android.view.WindowManagerImpl
1 2 3 public WindowManagerImpl createLocalWindowManager(Window parentWindow) { return new WindowManagerImpl(mDisplay, parentWindow); }
说明
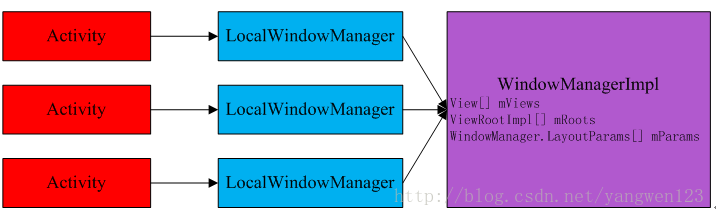
WindowManagerImpl为重量级的窗口管理器,应用程序进程中有且只有一个WindowManagerImpl实例(ServiceFetcher中缓存的对象),它管理了应用程序进程中创建的所有PhoneWindow窗口。
Activity并没有直接引用WindowManagerImpl实例,Android系统为每一个启动的Activity创建了一个轻量级的窗口管理器LocalWindowManager( createLocalWindowManager方法产生 ),
每个Activity通过LocalWindowManager来访问WindowManagerImpl
Activity、LocalWindowManage、WindowManagerImpl三者之间的关系如下图所示:
到此,attach过程完毕,继续看onCrate中做了哪些事情
Activity.onCreate 先上一张onCreate过程中的函数调用时序图
1 2 3 4 5 Activity->Activity: onCreate Activity->PhoneWindow: setContentView PhoneWindow->PhoneWindow: installDecor PhoneWindow->DecorView: newInstance PhoneWindow->PhoneWindow: generateLayout
1 2 3 4 5 public void onCreate(Bundle savedInstanceState) { super.onCreate(savedInstanceState); setContentView(R.layout.main_activity); ... }
在程序中,一般通过函数setContentView设置需要显示的View.
1 2 3 4 5 6 7 8 9 10 11 /** PhoneWindow **/ public void setContentView(int layoutResID) { //如果窗口顶级视图对象为空,则创建窗口视图对象 if (mContentParent == null) { installDecor(); } else {//否则只是移除该视图对象中的其他视图 mContentParent.removeAllViews(); } //加载布局文件,并将布局文件中的所有视图对象添加到mContentParent容器中 mLayoutInflater.inflate(layoutResID, mContentParent); }
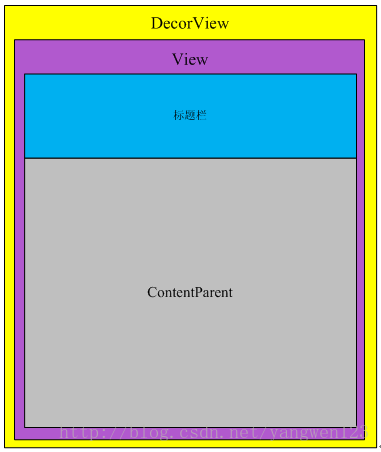
第5行函数生成了一个根View: DecorView
1 2 3 4 5 6 7 8 9 10 11 12 private void installDecor() { if (mDecor == null) { //返回DecorView,继承自FrameLayout mDecor = generateDecor(); mContentParent = generateLayout(mDecor); } if (mContentParent == null) { mContentParent = generateLayout(mDecor); //应用程序窗口标题栏 //应用程序窗口动作条 } }
小结
Activity窗口对象的创建,通过attach函数来完成;
Activity视图对象的创建,通过setContentView函数来完成
Activity关联Window 老规矩,献上一张时序图
先看handleResumeActivity函数实现
1 2 3 4 5 6 7 8 9 10 11 12 13 14 /** ActivityThread **/ final void handleResumeActivity(IBinder token,boolean clearHide, boolean isForward, boolean reallyResume) { //根据token从之前记录的信息中获取Activity信息 ActivityClientRecord r = performResumeActivity(token, clearHide); final Activity a = r.activity; //获取Activity的window信息 r.window = r.activity.getWindow(); View decor = r.window.getDecorView(); ViewManager wm = a.getWindowManager(); //将视图对象保存到Activity的成员变量mDecor中 a.mDecor = decor; //将视图decor添加到Activity所在窗口管理器中 wm.addView(decor, l); }
WindowManagerImpl
1 2 3 4 public final void addView(View view, ViewGroup.LayoutParams params) { applyDefaultToken(params); mGlobal.addView(view, params, mDisplay, mParentWindow); }
WindowManagerGlobal
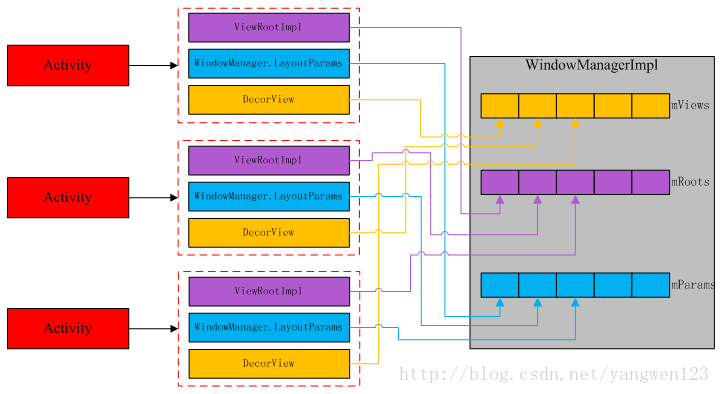
1 2 3 4 5 6 7 8 9 10 11 12 13 14 15 16 17 public void addView(View view, ViewGroup.LayoutParams params,Display display, Window parentWindow) { ViewRootImpl root; int index = findViewLocked(view, false); if (index >= 0) { //如果已经存在,异常退出 throw new IllegalStateException("View " + view + " has already been added to the window manager."); } // 为Activity创建一个ViewRootImpl对象 root = new ViewRootImpl(view.getContext(), display); //记录 mViews.add(view); mRoots.add(root); mParams.add(wparams); //添加view root.setView(view, wparams, panelParentView); }
ViewRootImpl构造过程 ViewRootImpl
1 2 3 4 5 6 7 8 9 10 11 final Surface mSurface = new Surface(); final class ViewRootHandler extends Handler { //... } public ViewRootImpl(Context context, Display display) { //返回缓存的WindowSession mWindowSession = WindowManagerGlobal.getWindowSession(); mWindow = new W(this); mAttachInfo = new View.AttachInfo(mWindowSession, mWindow, display, this, mHandler, this); mChoreographer = Choreographer.getInstance(); }
通过WindowManagerGlobal.getWindowSession()得到IWindowSession的代理对象,用于和WMS通信
创建了一个W本地Binder对象,用于WMS通知应用程序进程
采用单例模式创建了一个Choreographer对象,用于统一调度窗口绘图
创建ViewRootHandler对象,用于处理当前视图消息
构造一个AttachInfo对象
创建Surface对象,用于绘制当前视图,该Surface对象的真正创建是由WMS来完成
视图View的添加过程 ViewRootImpl
1 2 3 4 5 6 7 8 9 10 11 12 13 14 public void setView(View view, WindowManager.LayoutParams attrs, View panelParentView) { if (mView == null) { mView = view; mAttachInfo.mRootView = view; // 在添加窗口前进行UI布局 requestLayout(); //将窗口添加到WMS服务中 res = sWindowSession.add(mWindow, 参数); //建立消息通道 if (mInputChannel != null) { //... } } }
窗口布局-绘制过程 ViewRootImpl
1 2 3 4 5 6 7 8 public void requestLayout() { scheduleTraversals(); } void scheduleTraversals() { //向Choreographer注册回调 mChoreographer.postCallback(Choreographer.CALLBACK_TRAVERSAL, mTraversalRunnable, null); scheduleConsumeBatchedInput(); }
TraversalRunnable 的run方法执行了doTraversal()函数,而doTraversal又调用performTraversals()函数.
1 2 3 4 5 6 7 8 9 10 11 12 private void performTraversals() { //1.执行窗口测量 measureHierarchy(host, lp, res, desiredWindowWidth, desiredWindowHeight); //2. 向WMS服务添加窗口 relayoutWindow(params, viewVisibility, insetsPending) //3. View测量 performMeasure(childWidthMeasureSpec, childHeightMeasureSpec); //3. View布局 performLayout(); //4. View绘制 performDraw(); }
relayoutWindow
1 2 3 private int relayoutWindow(WindowManager.LayoutParams params, 参数) throws RemoteException { mWindowSession.relayout(mWindow, mSeq, params,参数,mSurface); }
performMeasure
1 2 //mView = DecorView mView.measure(childWidthMeasureSpec, childHeightMeasureSpec);
performLayout
1 2 3 4 private void performLayout() { //host = view host.layout(0, 0, host.getMeasuredWidth(), host.getMeasuredHeight()); }
performDraw
1 2 3 4 5 6 7 8 9 10 11 12 private void performDraw() { draw(fullRedrawNeeded); } private void draw(boolean fullRedrawNeeded) { //硬件渲染 if(...){ mAttachInfo.mHardwareRenderer.draw(mView, mAttachInfo, this); }else{ //软件渲染 drawSoftware(surface, mAttachInfo, xOffset, yOffset, scalingRequired, dirty) } }
窗口添加过程 Session.java
1 2 3 public int add(IWindow window,...) { return mService.addWindow(this, window,...); }
WindowManagerService
1 2 3 4 5 6 7 8 9 10 11 12 13 14 15 16 17 18 public int addWindow(Session session,IWindow client, ...) { //判断窗口是否已经存在 if (mWindowMap.containsKey(client.asBinder())) { return WindowManagerImpl.ADD_DUPLICATE_ADD; } //根据attrs.token从mWindowMap中取出应用程序窗口在WMS服务中的描述符WindowState attachedWindow = windowForClientLocked(null, attrs.token, false); //根据attrs.token从mTokenMap中取出应用程序窗口在WMS服务中的 WindowToken WindowToken token = mTokenMap.get(attrs.token); //为Activity窗口创建WindowState对象 win = new WindowState(this, session, client, token, attachedWindow, seq, attrs, viewVisibility); //设置消息通道 win.setInputChannel(inputChannels[0]); //保存 mTokenMap.put(attrs.token, token); win.attach(); mWindowMap.put(client.asBinder(), win); }
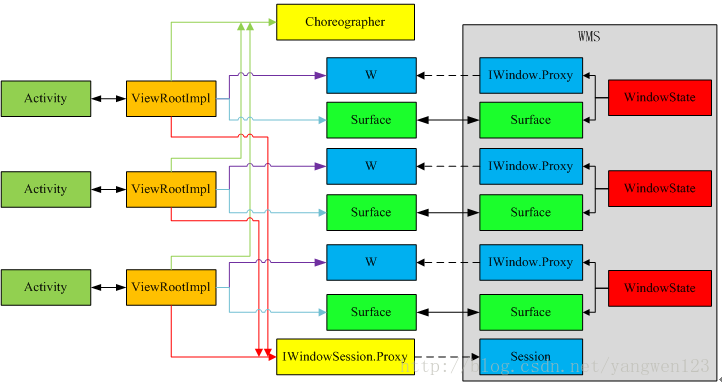
WMS保存了Window的信息,如下:
之后,调用WindowState的attach函数
1 2 3 4 5 6 7 8 9 10 11 12 void attach() { mSession.windowAddedLocked(); } void windowAddedLocked() { //WMS增加一个Window记录 if (mSurfaceSession == null) { mSurfaceSession = new SurfaceSession(); mService.mSessions.add(this); } mNumWindow++; }
WMS服务端都创建的对象
WindowState对象,是应用程序窗口在WMS服务端的描述符;
Session对象,应用程序进程与WMS服务会话通道
SurfaceSession对象,应用程序进程与SurfaceFlinger的会话通道;
参考:Android应用程序窗口设计框架介绍