主要思想
- 申请多个activity坑
- 欺骗AMS,在准备启动Activity时,启动一个坑Activity数据给AMS。
- AMS准备好回调到APP中启动activity时,替换成真正需要的Activity.

两个核心hook点
- 启动点:hook AM的startActivity方法
- app准备加载activity: activityThread mH
Activity启动流程分析
启动context.startActivity(intent)
context实现类为ContextImpl,查看代码:1
2
3
4
5
6/** ContextImpl**/
@Override
public void startActivity(Intent intent) {
mMainThread.getInstrumentation().execStartActivity(一堆参数);
}继续看Instrumentation的execStartActivity方法:
1
2
3
4public ActivityResult execStartActivity(
ActivityManagerNative.getDefault().startActivity(一堆参数);
}在第二行,ActivityManagerNative.getDefault()方法获取了AMS在App中的的远程代理对象,调用startActivity方法进入AMS。
__在这里hook AM,替换为stubActivity即可__。
进入AMS中,一系列调用,盗用一张图
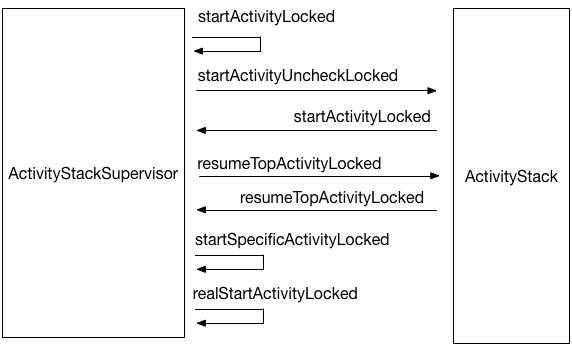
只关心最后一个函数realStartActivityLocked()
1
2
3final boolean realStartActivityLocked(ActivityRecord r,ProcessRecord app,boolean andResume, boolean checkConfig){
app.thread.scheduleLaunchActivity(一堆参数);
}经过这步之后,AMS已经建立了名称为Stub的ActivityRecord,并在第二行中回调至App中加载Activity类,执行生命周期方法。
scheduleLaunchActivity
1
2
3
4/** ActivityThread.ApplicationThread **/
public final void scheduleLaunchActivity(一堆参数) {
sendMessage(H.LAUNCH_ACTIVITY, r);
}1
2
3
4
5
6private void sendMessage(int what, Object obj, int arg1, int arg2, boolean async) {
Message msg = Message.obtain();
//...
mH.sendMessage(msg);
}给mH Handler发送了一个H.LAUNCH_ACTIVITY消息,看看mH的实现
1
2
3
4
5
6
7
8
9
10private class H extends Handler {
public static final int LAUNCH_ACTIVITY = 100;
public void handleMessage(Message msg) {
switch (msg.what) {
case LAUNCH_ACTIVITY:
final ActivityClientRecord r = (ActivityClientRecord) msg.obj;
handleLaunchActivity(r, null);
break;
}
}到这里,处理了AMS传过来了的数据,开始启动Activity
所以hook mH,可以在这里将stubActivity替换为真正的Activity
下看启动逻辑 handleLaunchActivity
1
2
3private void handleLaunchActivity(ActivityClientRecord r, Intent customIntent) {
Activity a = performLaunchActivity(r, customIntent);
}执行performLaunchActivity函数,从classLoader加载activity,并初始化。
1
2
3
4
5
6
7
8private Activity performLaunchActivity(ActivityClientRecord r, Intent customIntent) {
ComponentName component = r.intent.getComponent();
java.lang.ClassLoader cl = r.packageInfo.getClassLoader();
activity = mInstrumentation.newActivity(cl, component.getClassName(), r.intent);
activity.attach(appContext, this, getInstrumentation(), r.token,一堆参数);
//这里面调用了activity的onCreate()生命周期函数
mInstrumentation.callActivityOnCreate()
}至此,activity启动过程完毕。在此过程中,只需要把告知AMS要启动activity的信息替换为stub,在真正启动时替换回真正的activit,就可以达到activity插件化的目的。
DroidPlugin 的hook实现
hook ams
IActivityManagerHook类,在onInstall函数中通过动态代理的方式,hook了ActivithThrad实例中的ams远程代理对象1
2
3
4
5
6
7
8
9
10
11
12
13
14
15
16
17
18public void onInstall(ClassLoader classLoader) throws Throwable {
Class cls = ActivityManagerNativeCompat.Class();
//获取ams代理
Object obj = FieldUtils.readStaticField(cls, "gDefault");
if (IActivityManagerCompat.isIActivityManager(obj)) {
setOldObj(obj);
Class<?> objClass = mOldObj.getClass();
List<Class<?>> interfaces = Utils.getAllInterfaces(objClass);
Class[] ifs = interfaces != null && interfaces.size() > 0 ? interfaces.toArray(new Class[interfaces.size()]) : new Class[0];
//生成动态代理对象
Object proxiedActivityManager = MyProxy.newProxyInstance(objClass.getClassLoader(), ifs, this);
//替换原始对象
FieldUtils.writeStaticField(cls, "gDefault", proxiedActivityManager);
} else if (SingletonCompat.isSingleton(obj)) {
//android5.0后 singleton hook方式
}
}登记对startActivity方法的hook方法
1
2
3protected void init() {
sHookedMethodHandlers.put("startActivity", new startActivity(mHostContext));
}在程序调用startActivity方法时,由于动态代理,会调用到beforeInvoke,在这个方法中对intent中activity信息进行处理
1
2
3
4
5
6
7
8
9@Override
protected boolean beforeInvoke(Object receiver, Method method, Object[] args) {
if (Build.VERSION.SDK_INT < Build.VERSION_CODES.JELLY_BEAN_MR2) {
doReplaceIntentForStartActivityAPILow(args);
} else {
doReplaceIntentForStartActivityAPIHigh(args);
}
return super.beforeInvoke(receiver, method, args);
}以doReplaceIntentForStartActivityAPILow方法为例,查看替换操作
1
2
3
4
5
6
7
8
9
10
11
12
13
14
15
16
17
18
19
20protected void doReplaceIntentForStartActivityAPILow(Object[] args){
int intentOfArgIndex = findFirstIntentIndexInArgs(args);
if (args != null && args.length > 1 && intentOfArgIndex >= 0) {
Intent intent = (Intent) args[intentOfArgIndex];
//找到一个activit坑
ActivityInfo proxyActivityInfo = selectProxyActivityInfo(activityInfo, intent, token, requestCode);
ComponentName component = new ComponentName(proxyActivityInfo.packageName, proxyActivityInfo.name);
//intent替换为坑组件
Intent newIntent = new Intent();
newIntent.setComponent(component);
setExtraClassLoaderForAdapter(new ComponentName(activityInfo.packageName, activityInfo.name), intent);
//加上原始activity信息
newIntent.putExtra(Env.EXTRA_TARGET_INTENT, intent);
newIntent.putExtra(Env.EXTRA_TARGET_INFO_OBJECT, activityInfo);
newIntent.addFlags(proxyActivityInfo.launchMode);
newIntent.setAction(activityInfo.name);
//替换参数中原始intent为处理过的intent
args[intentOfArgIndex] = newIntent;
}
}至此,droidplugin对activit的hook实现脉络分析完成。接下来看真正启动activity的时机和反替换操作
hook mH
在启动路径中,可只,在AMS准备好后回调到APP中,经过一系列调用,会向activitThread的mH handler发送一个LAUNCH_ACTIVITY的消息,并在消息中携带activit的信息。因此,通过hook mH,就可以在真正启动activit前,将坑activity数据替换回真正的activity,达到启动插件activity的目的。
hook activityThread上的mH
1
2
3
4
5
6
7
8
9
10
11
12
13
14/** PluginCallbackHook **/
protected void onInstall(ClassLoader classLoader) throws Throwable {
Object target = ActivityThreadCompat.currentActivityThread();
Class ActivityThreadClass = ActivityThreadCompat.activityThreadClass();
/*替换ActivityThread.mH.mCallback,拦截组件调度消息*/
Field mHField = FieldUtils.getField(ActivityThreadClass, "mH");
Handler handler = (Handler) FieldUtils.readField(mHField, target);
Field mCallbackField = FieldUtils.getField(Handler.class, "mCallback");
//*这里读取出旧的callback并处理*/
Object mCallback = FieldUtils.readField(mCallbackField, handler);
PluginCallback value = PluginCallback.getInstance(mHostContext, handler, mCallback != null ? (Handler.Callback) mCallback : null);
value.setEnable(isEnable());
FieldUtils.writeField(mCallbackField, handler, value);
}对启动activity的地方进行消息拦截,进行处理。逻辑在PluginCallback类中.
1
2
3
4
5
6public boolean handleMessage(Message msg) {
if (msg.what == LAUNCH_ACTIVITY) {
return handleLaunchActivity(msg);
}
}拿到intent中携带的插件actiivty信息,替换intetnt上组件为插件的组件信息,替换intent上pkg对象的classLoader为插件的classLoader,之后按照正常流程执行对activity的调用。
handleLaunchActivity
1
2
3
4
5
6
7
8
9
10
11
12
13
14private boolean handleLaunchActivity(Message message) {
Object/*ActivityClientRecord*/ _activityClientRecord = message.obj;
Intent stubIntent = (Intent) ActivityThread.ActivityClientRecord.intent.get(_activityClientRecord);
IntentMaker intentMaker = IntentMaker.fromActivityIntent(stubIntent);
Intent targetIntent = intentMaker.intent;
//获取插件组件信息
ComponentName targetComponentName = targetIntent.resolveActivity(mHostContext.getPackageManager());
//获取插件activity信息
ActivityInfo targetActivityInfo = PluginManager.getInstance().getActivityInfo(targetComponentName, 0);
targetIntent.setClassName(targetComponentName.getPackageName(), targetComponentName.getPackageName() + targetComponentName.getClassName());
FieldUtils.writeDeclaredField(message.obj, "intent", targetIntent);
FieldUtils.writeDeclaredField(message.obj, "activityInfo", targetActivityInfo);
}函数一堆替换,实际上就是将ActivityClintRecord上的intent替换回插件发送的pluginIntent,而pluginIntent上携带需要启动的activity信息。
接着,进入源码1
2
3
4
5
6
7
8
9/** ActivityThread **/
private Activity performLaunchActivity(ActivityClientRecord r, Intent customIntent) {
ComponentName component = r.intent.getComponent();
java.lang.ClassLoader cl = r.packageInfo.getClassLoader();
activity = mInstrumentation.newActivity(
cl, component.getClassName(), r.intent);
activity.attach(appContext, this, 参数);
mInstrumentation.callActivityOnCreate(activity, r.state);
}由于intent是插件发送的intent,所以 component.getClassName()是插件activity。而r.packageInfo.getClassLoader()实际上返回的是插件的classLoader,所以系统可以正确的找到插件的class,执行onCreate()一系列函数。
替换classLoader
上一步中说过r.packageInfo.getClassLoader()返回的是插件的classLoader,为什么呢?先看系统的创建Activity的源码1
2
3
4
5
6
7
8
9
10
11/** LoadedApk **/
public ClassLoader getClassLoader() {
if (mClassLoader != null) {
return mClassLoader;
}
zipPaths.add(mAppDir);
libPaths.add(mLibDir);
//...
mClassLoader = ApplicationLoaders.getDefault().getClassLoader(zip, lib,
mBaseClassLoader);
}classLoader是从LoadApk上去找,要么返回缓存,要么重新创建一个。实际上,在加载插件的时候,就已经将mClassLoader替换成插件的,所以永远返回的是插件的classLoader。
实际上这一步有更好的方案,只需将LoadedApk上的mAppDir等路径修改为插件的路径,由系统自己创建classLoader,兼容性会更好。
继续看源码中替换classLoader的操作
1
2
3
4
5
6
7
8
9
10/** PluginProcessManager **/
private static void preLoadApk(Context hostContext, String packageName){
//获取插件的上下文
Context context = createPackageContext(hostContext, packageName);
Object loadedApk = ContextImpl.mPackageInfo.get(context);
//创建插件的classLoader
classloader = new PathClassLoader(applicationInfo.sourceDir, applicationInfo.nativeLibraryDir, parentClassloader);
//换classLoader
LoadedApk.mClassLoader.set(loadedApk, classloader);
}很简单,就是将LoadedApk上的classLodaer换成插件的。
至此,Activity插件化分析完毕。
参考: